This article outlines the steps taken to sniff and review SSL traffic of a NodeJS application I was working with. It covers setting up the intercept using Charles Proxy. Links for alternative means are included as well. The approach is similar for any proxy tool. The reason I outlined this is to give an overview for TF2Autobot specifically and to remind others that Node doesn’t support proxy out of the box for its native http and https calls using environment variables. I was searching for NODE_DEBUG=’https’ commands and came to the conclusion that just using a Debug Proxy (Charles Proxy or Proxyman) is the easiest.
To setup the proxy, I used a tip I learned when I was inflicted with Netskope and they have a nice article about how to how to make development tools work with SSL interception. They have instructions for integration MITM network security with Node.JS and other tools like AWS CLI. NodeJS they mention the following which is helpful because this is how you can easily add a Debug Proxy to your NodeJS process. In my case, I’m debugging TF2Autobot trying to get an understanding of how it is working with the backpack.tf public API. Netskope explains for NodeJS the best approach is to use the Combined Certificate bundle at let Node know about it “NODE_EXTRA_CA_CERTS” environment variable. Here is Netskope’s explanation.
export NODE_EXTRA_CA_CERTS=[your CA certificate file path]
The cafile configuration property works similarly: npm config set cafile [your CA certificate file path]
The main difference between NODE_EXTRA_CA_CERTS and the cafile config property is that the former adds a cert, whereas the cafile config property replaces the certs. For those that just want to add a corporate cert to the chain, NODE_EXTRA_CA_CERTS is the easier option
https://docs.netskope.com/en/configuring-cli-based-tools-and-development-frameworks-to-work-with-netskope-ssl-interception.html
Using Charles Proxy to intercept NodeJS
To get the https traffic off my application I need to get the Charles Proxy SSL certificate. The details are explained in their SSL Proxying Documentation. I downloaded the “base 64 pem” by clicking Help then navigating to get the certificate via: Help > SSL Proxying > Save Charles Root Certificate…
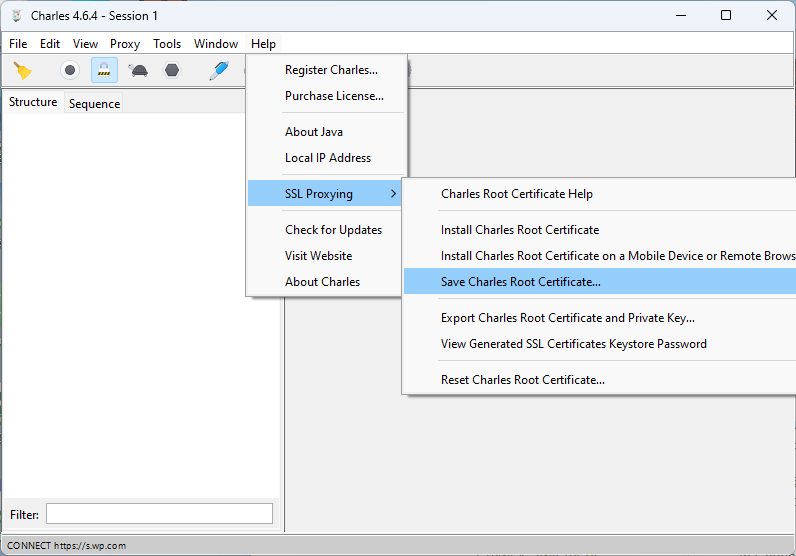
The “Save Charles Root Certificate” dialog wants a directory selected. Typically it’ll open the Save chooser in your home directory. Don’t bother trying to put it in another directory because the save dialog didn’t respect my ask and just saved it under the first spot it suggests it’ll save it. My certificate was save under my username path, i.e. "C:\Users\username\charlesProxy.pem".
Disable some of Charles Proxy Windows sniffing
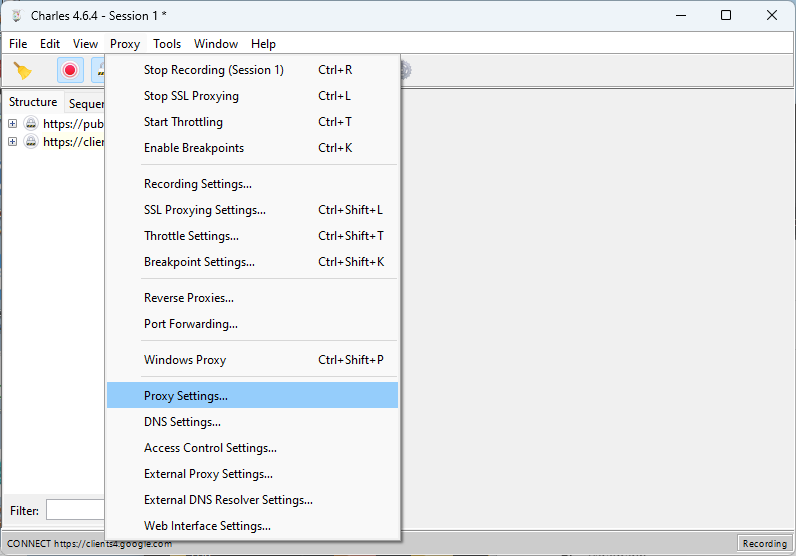
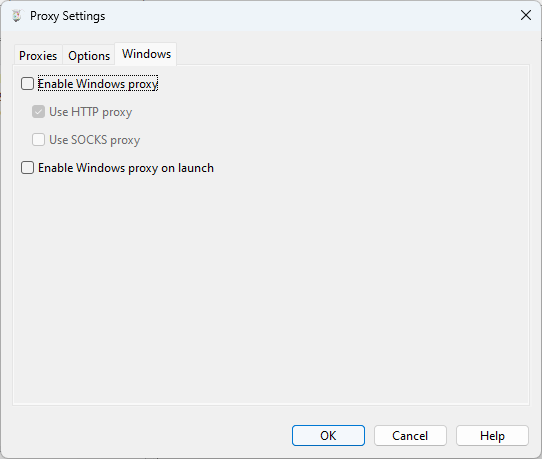
Charles is very good out of the box for windows. I found that I actually wanted to disabled the default Windows proxy. To do so I used the “Proxy” menu and then selected “Proxy Settings”. Under the Windows tab of the Proxy Settings dialog, disable “Enable Windows proxy” and “Enable Windows proxy on launch”. Since Windows Proxy was already enabled. Once I turned it off I had to restart the program to make it stop sniffing everything else. I tried to see if it would pick up the NodeJS traffic and it wouldn’t just out of the box. So disabling this feature allows the traffic to just be on the program I’m working on.
To make sure the traffic was captured, I added a wildcard match for Include Locations under the SSL Proxying Settings.

Configure TF2Autobot to use Charles Proxy
There are two items to take care of here, configuring NodeJS to enabled using extra CA Certificates and then adding HTTPS_PROXY to enable axios to pipe traffic through Charles Proxy. The extra CA certificates tells NodeJS to trust certs that Charles Proxy will create to man in the middle (MITM) the SSL traffic that is being proxied.
Once I had the certificate I was ready to configure my bot environment so that I may debug the traffic. I cannot put it in the .env of the bot as that only injects env into the program, not NodeJS itself. I think the ecosystem.json files are fine but I’m just running the following for my config.
http_proxy=http://localhost:8888;https_proxy=http://localhost:8888;NODE_EXTRA_CA_CERTS=C:\Users\username\charlesProxy.pem
Because I’m just running this as a development exercise in Webstorm, I’m going to set the Environment variables of my Run Configuration. VSCode has instructions that include how to modify a launch.json to include env variables.

Running and Intercepting the Application Traffic
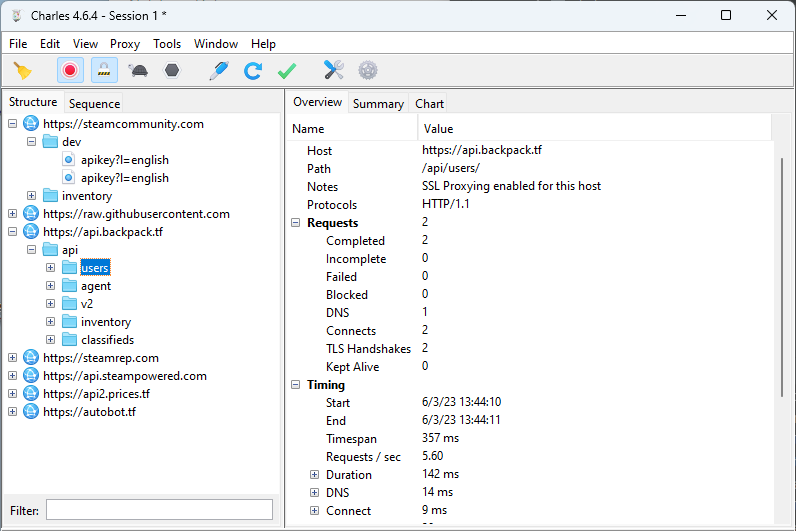
Okay so almost ready. First I check to make sure Charles is ready by ensuring the red record button is enabled, the pad lock icon is enabled (SSL intercept), and I click the broom icon to clean out any old session stuff.
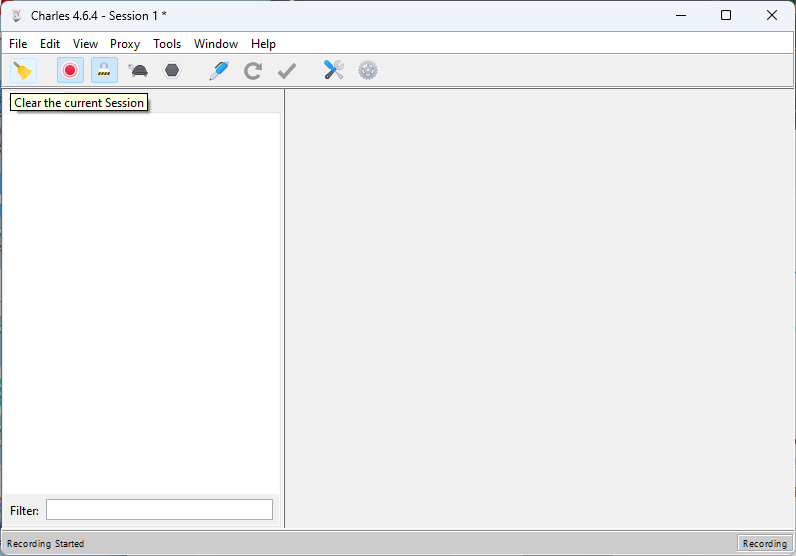
With the proxy good, I prepare the code with npm install and npm run build. Then I start the bot with the configuration that includes the CA bundle variable and proxy settings and traffic can be reviewed.
Conclusion
I enjoy Charles Proxy for it’s inexpensive license and feature set. Others may prefer tools like Postman or Proxyman. If you’d like to apply the techniques described in this article the primary difference will be setting up Postman to Capture HTTPS traffic or reading up on how Capture HTTP/HTTPS traffic from NodeJS via Proxyman.
PS AWS SDKs and CLIs + Netskope
Netskope has a script which they lock behind a support login which I believe does SDK and CLI specific CA certificate bundles like in the CLI specific option of ca_bundle however I found, as mentioned in the docs, that just setting the AWS_CA_BUNDLE environment variable is much more efficient to get it to work for Amplify CLI, CDK, and any derived tools that use AWS SDK. Make sure you point it at the “Combined Certificate Bundle”.
